The questions that come up most, and what to do about them.
Why does my session drop?
One reason is switching away. When you leave Term, it asks the system for a short background grant and holds the connection for up to 70 seconds — come back inside that window and the session is untouched, so taking a call or replying to a message will not disconnect you. The system may allow less than that (its own window is capped at around three minutes, or about a minute on low battery), and Term hands the grant back the moment you return. Past the window, to save power, HarmonyOS suspends apps that stay in the background, and the connection closes with them: the SSH session ends, and whatever was running inside it stops.
The other reason is the network moving under you, and this one does not need Term to leave the screen at all. A plain SSH connection — and telnet — is a TCP connection pinned to one IP address at each end: hand the phone from Wi-Fi to 5G, walk out of range of an access point, or ride through a lift or a tunnel, and that address changes or the packets stop arriving. The session is gone even though Term was in front of you the whole time, and usually there is no sign of it until you type and nothing comes back. mosh is the transport that survives this: it runs over UDP and is keyed to a session rather than to an address, so it picks up again on the new network by itself.
Here are four ways to deal with it. The first three keep a session alive — simplest first, sturdiest last. The fourth is for when it drops anyway.
Option 1 · Keep Term in the foreground
As long as Term is on screen, the session stays alive. Put it in a floating window or split screen and it still counts as foreground — so you can use another app without dropping the connection.
Floating window: swipe up from the bottom of the screen and pause to open Recents, then tap the floating window icon on the Term card. The terminal shrinks to a small draggable window.
Split screen: from the same Recents view, tap the split screen icon on the Term card and pick a second app to sit alongside it.
Leave the session running while you look something up or reply to a message, then carry on typing — the connection never dropped.
Option 2 · mosh + a multiplexerRecommended
Run tmux (or screen, or zellij) on the server, ideally over a mosh connection. mosh survives network changes and reconnects by itself, while the multiplexer keeps your programs running on the server — disconnect whenever, come back whenever, pick up exactly where you were.
Install tmux on the server: sudo apt install tmux (Debian/Ubuntu) or sudo dnf install tmux (Fedora).
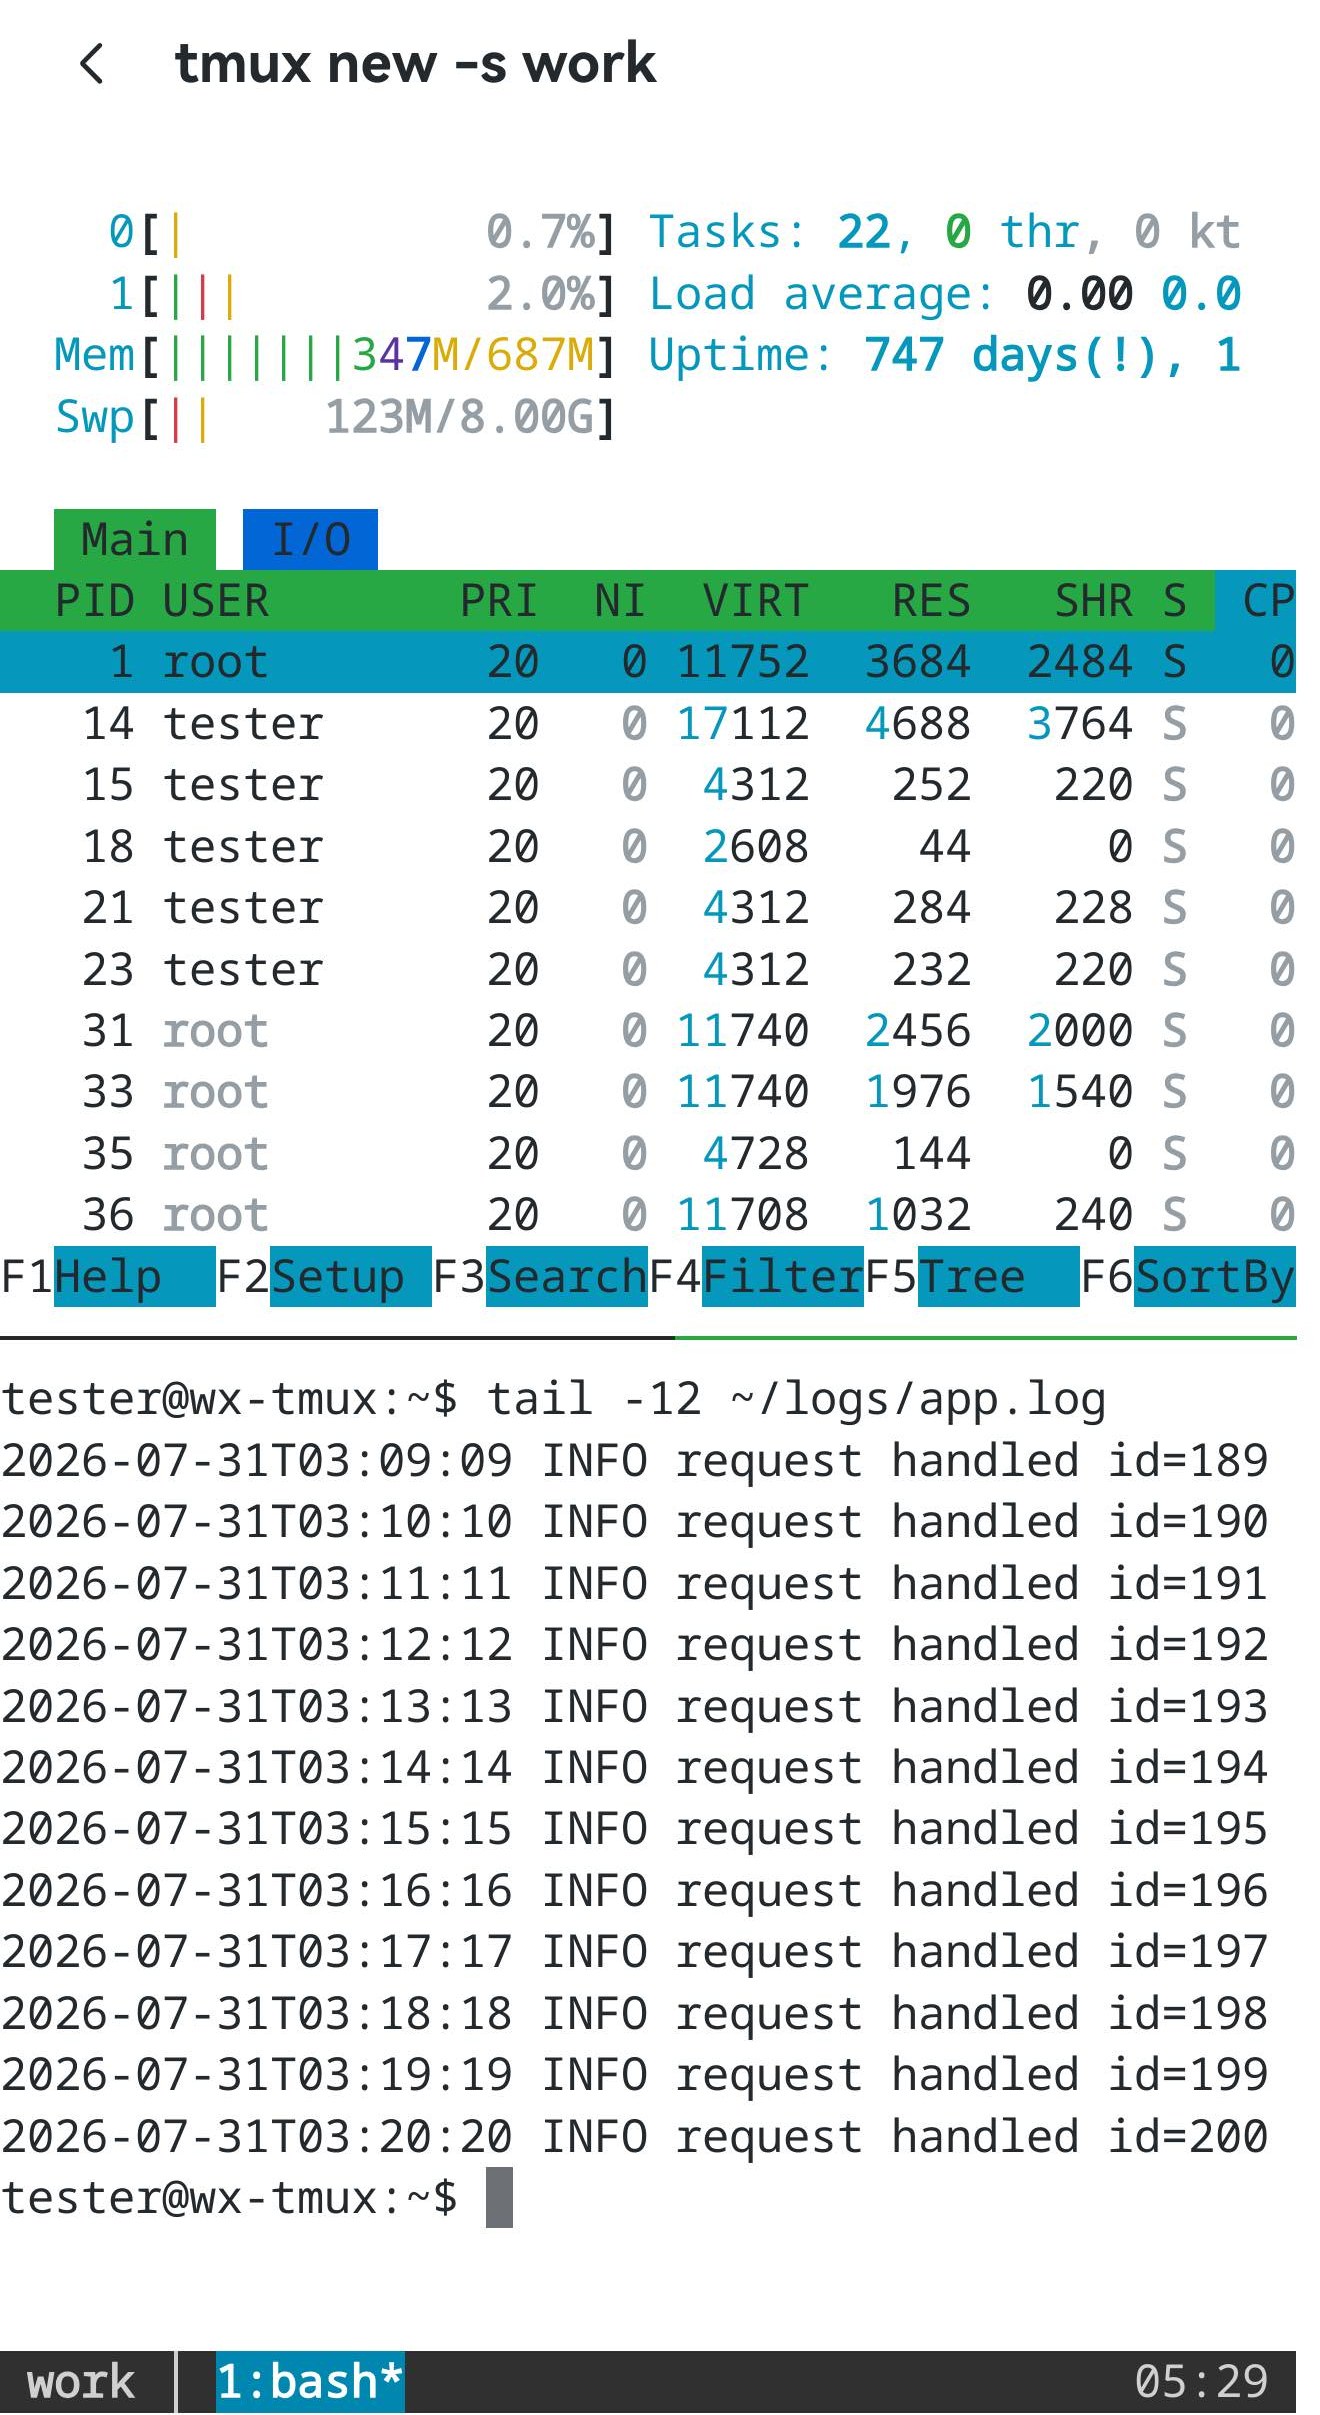
Connect to the host from Term and start a named session: tmux new -s work.
Work inside it as usual — the session stays on the server even if the phone locks, backgrounds Term, or loses the network.
Reattach after reconnecting: tmux attach -t work, and everything is as you left it.
Going further: set a new host’s transport to mosh (the server needs mosh-server) and roaming between Wi-Fi and cellular stops dropping you.
tmux — on the server
# start a named session
tmux new -s work

# reattach after reconnecting
tmux attach -t work
A stock tmux quietly swallows several things Term can do — inline images, the clipboard, modifier-rich keys — and it does not complain, it simply does nothing. So it is worth configuring once, and the file we test Term against has a page of its own, with every line commented and a button to copy it whole. One line in it is there for this answer in particular: tmux sends its clipboard OSC 52 with an empty target, mosh forwards only the 52;c; form, and without the terminal-overrides line that corrects it, a copy made inside tmux reaches tmux’s own paste buffer and never leaves the server. The two image lines also get their own answer further down this page.
Let long jobs run detached from the terminal: start them inside tmux/screen, or use nohup … &. The job finishes on the server even if the app disconnects — reconnect afterwards to check the result.
nohup — on the server
# run detached, output to out.log
nohup ./long-task.sh > out.log 2>&1 &

# check progress after reconnecting
tail -f out.log
Option 4 · Let Term bring it back
v26.1.0+
The three above keep the session alive. This one assumes that one day it will not be — the phone gets suspended, the network dies — and gets you back to your work anyway. Give the host a startup script that attaches a multiplexer, and an Auto-resume sessions toggle appears under it: with that on, a tab killed along with the app reopens on the next launch, and a tab dropped while Term sat in the background reconnects when you come back to it.
Nothing is being resurrected here, and it matters that you know it: a dropped SSH connection is gone, with no session waiting on the far side. Term reconnects — the multiplexer is what kept your work running, and the startup script is what puts you back inside it. Which is why the toggle only appears once the script actually attaches something; SSH-only, off by default, and a tab you closed yourself stays closed.
Install tmux on the server if it is not there yet, and know which session name you want to live in — main below.
Edit the host → Advanced options → Startup script, and set one that attaches: tmux new -A -s main creates the session or attaches to the existing one, so the same line works on the first connection and every one after it.
An Auto-resume sessions toggle appears directly below the field. Turn it on and save.
That is all of it. Kill the app with the tab open and the next launch brings it back; leave Term in the background until the connection dies and it reconnects when you return.
Startup scripts that qualify
# tmux — create the session, or attach if it already exists
tmux new -A -s main

# zellij
zellij attach -c main
Start a named session and Term notices that tmux is the foreground program, then swaps the key bar above the soft keyboard for a tmux set — esc, the ^B prefix, the four arrows, and a row of prefix combos that go out on one tap. It recognises tmux from the command shell integration reports, which is on by default, so leave that switch alone.
Connect to the host and start a named session: tmux new -s work.
The key bar switches to the tmux set: ^B[ for copy mode (this is how you scroll back), ^Bz to zoom a pane, ^B% and ^B" to split, ^Bc for a new window, ^Bn / ^Bp for the next and previous window, ^Bw for the window list, ^Bd to detach — with ^C and ^R still there, because underneath it is still a shell prompt.
The set is built in and follows the foreground program — there is nothing to configure. For any other control key, tap ctrl at the left end of the key bar: it arms the modifier for the next key you press (alt and shift work the same way).
Detach with ^Bd when you leave — the session, and everything running in it, stays on the server.
Reattach next time with tmux attach -t work and it is all as you left it.
A tmux split — two stacked panes, htop and tail -12 ~/logs/app.log. The dark line at the foot is tmux’s own status bar: the session name work on the left, the window 1:bash* in the middle, a clock on the right. The tmux new -s work up in the header is shell integration reporting the command — which is exactly what selected the tmux key set.Detach, then reattach — after ^Bd, tmux prints [detached (from session work)] and hands the shell back; the tmux attach -t work on the next line brings the whole session back, unchanged.
How do I connect over mosh?
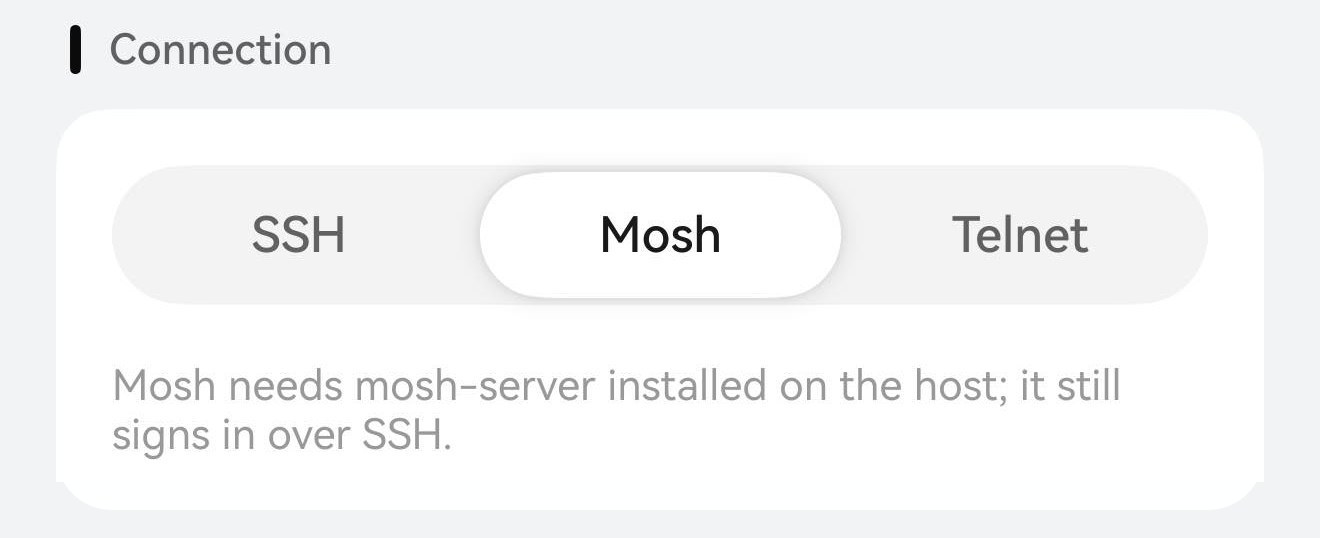
Install mosh on the server first — what Term needs out of it is the mosh-server binary. Then edit the host and set Connection to Mosh; the hint under the control already says it: the sign-in still goes over SSH, and only then is the session handed to UDP. Which is why the server side also has to let UDP 60000–61000 through — or, if only a few UDP ports are open to you, pin mosh to those in the host editor. Once you are on it, switching between Wi-Fi and cellular or losing signal will not drop you — the session reconnects itself, and the background rule above does not apply to it.
Install it on the server — mosh is packaged nearly everywhere, so it is usually one line; the block below has the command for each of the common systems, macOS included. On RHEL, Rocky and AlmaLinux it comes from EPEL, so enable that first.
Edit the host in Term → Connection → Mosh. Host, port and username stay exactly as they were for SSH, because the sign-in is still SSH.
Open UDP 60000–61000 on the server and anywhere in between — left to itself, mosh picks a port inside that range. If only certain ports are open to you, name them in UDP port or range (optional) under Connection: one port (60000) or a range (60000:61000). Blank keeps the automatic behaviour.
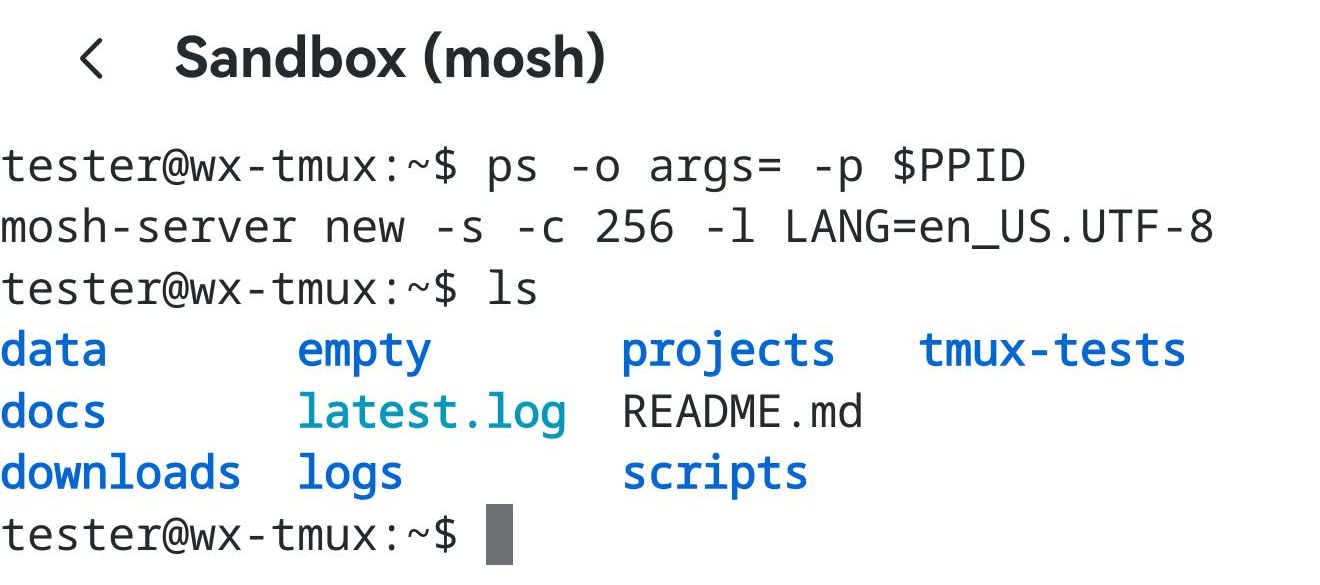
To confirm you really are on mosh, run ps -o args= -p $PPID: the shell’s parent should print as mosh-server, not sshd.
Connection · Mosh — the segmented control in the host editor (SSH / Mosh / Telnet) with Mosh selected. The Server card above it keeps the same host, port and username SSH used. The line underneath is the app’s own hint — the host needs mosh-server, and the sign-in still happens over SSH.
mosh — on the server
# install mosh — what Term needs is the mosh-server binary
sudo apt install mosh # Debian / Ubuntu
sudo dnf install mosh # Fedora / RHEL
sudo pacman -S mosh # Arch
sudo zypper install mosh # openSUSE
sudo apk add mosh # Alpine
brew install mosh # macOS (Homebrew)
sudo pkg install mosh # FreeBSD# confirm the parent process really is mosh-server
ps -o args= -p $PPID
Checking it really is mosh — ps -o args= -p $PPID answers mosh-server new -s -c 256 …: the shell’s parent is mosh-server, not sshd, so the session is running over UDP. The header reads Sandbox (mosh) for the same reason.
Because mosh repaints the screen rather than streaming every line, so there is no history for Term to scroll — that is mosh’s design, not a limit in Term. If you want scrollback, run tmux (or screen, or zellij) on the server and use its own: in tmux that is copy mode, ^B[ on the key bar (see the tmux section above). The app says the same thing in place — as a first-run mosh tip, and as a toast the first time you drag upward in a mosh session.
Does closing a mosh tab end the session?
Yes. Closing a mosh tab shuts the remote session down: Term sends mosh’s shutdown datagrams to end it, and if those never arrive it goes back in over SSH to clean up the stranded mosh-server — so a mosh-server does not get left behind on the host. If you want to come back to it later, leave the tab open. And if the work has to outlive the tab, that is exactly what tmux is for: run it inside the mosh session, and closing the tab only detaches you.
“mosh-server didn't start” / “mosh's UDP session didn't get through”
mosh signs in over SSH first and then hands the session to UDP — these two messages are the two halves failing, and Term tells you which one you hit. The failure screen keeps the raw error and its E_ code underneath, which is what to paste into a bug report, and offers Edit host and Retry.
Connected, but mosh-server didn't start. The sign-in worked and the binary is what is missing — install mosh on the server, or switch this host back to SSH.
Connected over SSH, but mosh's UDP session didn't get through. mosh-server started and the datagrams never arrived — open UDP 60000–61000 on the server and anywhere in between.
Do inline images work inside tmux?
Yes, with two lines in your tmux.conf. Term decodes sixel, the kitty graphics protocol and iTerm2’s imgcat (OSC 1337) natively — PNG, JPEG and the first frame of a GIF — and composites the image underneath the text. To get through tmux, images use kitty’s Unicode-placeholder scheme, where the image id rides in a cell’s truecolor foreground. So tmux has to do two things: pass the escape sequence through, and keep truecolor inside the session. Without the second, tmux downsamples the id-carrying colour to 256 colours, the id is corrupted, and the image breaks. Both lines need tmux 3.3a or newer — an older tmux answers "unknown option" on start and the images silently never appear.
~/.tmux.conf
# let the image escape sequences through
set -g allow-passthrough on

# keep truecolor inside tmux, or the image id is corrupted
set -as terminal-features ",*:RGB"
Notes and references
mosh sessions are unaffected — they survive the background and reconnect on their own, so the background warning does not apply to them. The app says the same thing in place: the background-session banner on the host page opens a "keep sessions alive" help page.
![Two lines in the terminal: tmux printing [detached (from session work)], and below it a prompt with tmux attach -t work typed in.](/_astro/tmux-attach.B64Mig2f.jpeg)